
How to setup Cloudflare Dynamic DNS(DDNS) with OpenWRT router
Do you want to update your DNS when your IP changes? Are you using a router running OpenWRT and Cloudflare? Then this short guide is perfect for you!
Let’s dive right into it. The OpenWRT router needs to modify your DNS settings on Cloudflare, so we need to create an API token. We could use the global API token, but we’ll use an API token with more limited access instead.
Creating a token on Cloudflare
Head to Cloudflare and go to My profile -> API Tokens -> Create Token -> Create custom token.
Give your token a name, e.g., OpenWRT DDNS and add the following permissions:
- Zone, DNS: Edit
- Zone Resources, Specific Zone: example.com
Under Zone Resources, select Include, then Specific Zone and choose your domain, e.g., example.com. Hit Continue to summary and then Create Token.
Remember to take note of this token as you’ll need it later and it will not show here in Cloudflare dashboard.
Configuring OpenWRT
Next up is configuring OpenWRT to work with Cloudflare. We’ll mostly use the Web GUI, but we’ll also SSH into the router to make a small change to how authentication is done with Cloudflare.
In the Web GUI, do the following:
- Go to System -> Software and press Update lists.
- Enter “ddns” into the filter field, and press Install on the
ddns-scripts-cloudflareand theluci-app-ddnspackages. - Log out of the GUI and back in. You should now have a Services -> Dynamic DNS option. Go to it.
- Press Edit on
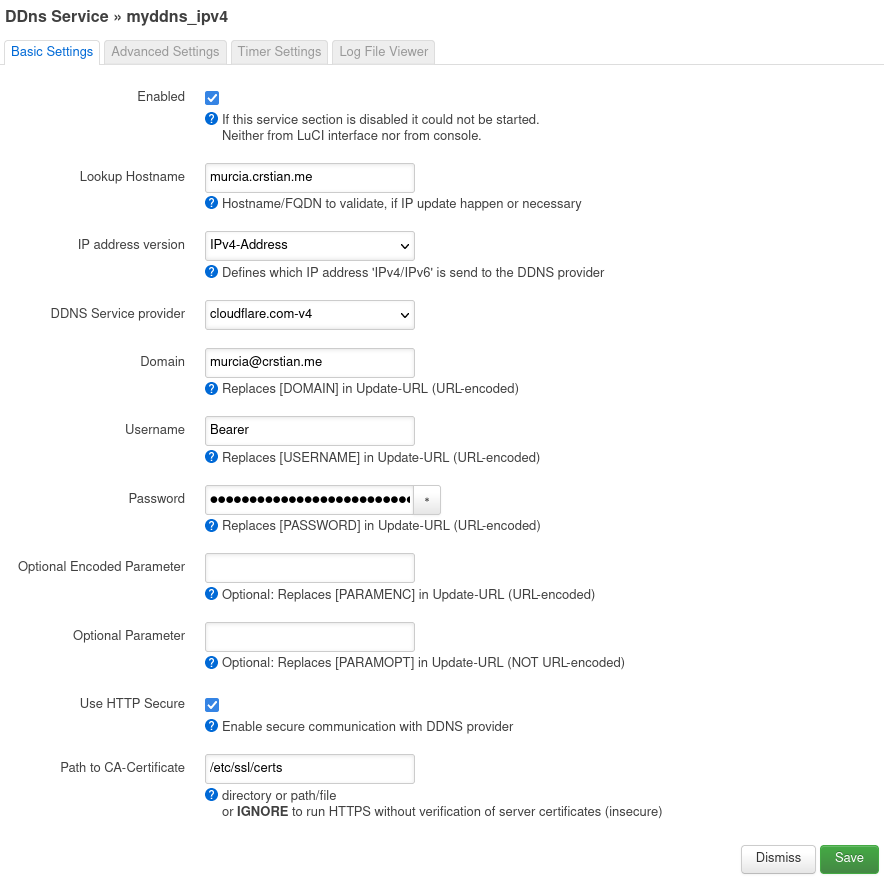
myddns_ipv4. - Set DDNS Service provider to
cloudflare.com-v4and click Switch service. - Then set Lookup Hostname and Domain to the domain you want to update, e.g.,
example.com or subdomain.example.com. Check the Enable and the Use HTTP Secure checkbox, set Path to CA-Certificate to/etc/ssl/certs. - Finally, set the Username to
Bearerand paste the Cloudflare token you created into the Password field and hit Save and then Save & Apply.
If you want to update a subdomain instead, use the following format in the Domain field: [email protected] and subdomain.example.com in the Lookup field.
The settings should now look something like this:

Note: This above Advance Settings will update your openwrt dynamic IP to Cloudflare A Record and the settings in the following picture will update Cloudflare A Record fixed IP (it will update in openwrt not in cloudflare dns record).

Once this is done, click on Save and Apply.
Now, head to Services -> Dynamic DNS and press the Start/Stop button twice to restart the service.
You should now have a setup that only talks to Cloudflare when the IP has changed.
Congratulations!⭐
Enjoy.